Showing posts with label Japanese. Show all posts

Monday, January 16, 2012

Vegan Caterpillar Roll

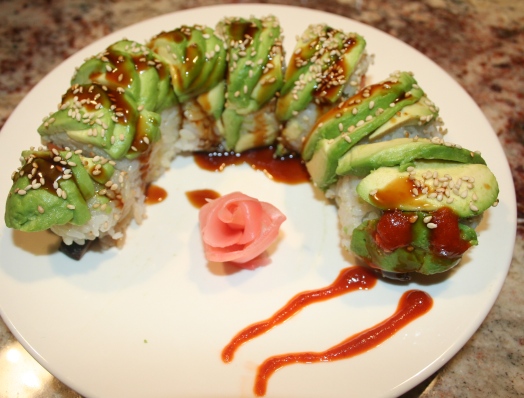
Vegan Caterpillar Sushi Roll
This blog was inspired by my recent visit to San Diego.  I searched for a vegetarian restaurant in the area using the Internet and was directed to Sipz Fusion Vegetarian Restaurant.  After reading a few reviews, I was interested to try their variety of vegan sushi.  I haven't had sushi for a while and was excited to try several kinds of vegan sushi from this restaurant.

Unfortunately, when we arrived to the restaurant during lunch time, we were told that they didn't serve vegan sushi until after 5 pm.  Bummer! What a disappointment!  We had to go home that day and won't be back to Sipz that night.  Apparently, the sushi chef is a different chef from the restaurant's.  He rented a space in the corner of the vegetarian restaurant to make sushi every night.  Oh well!  We ordered other dishes and had delicious and yummy food.  Don't take me wrong, Sipz is a really good restaurant and it was crowded, too.  We'll be back some day for the vegan sushi.  We consumed other lunch dishes that day instead.

Hence, I still didn't have any sushi.  So I decided to take their sushi menu home.  It says on the menu that their Caterpillar Roll is "Everybody's favorite!":   I decided to create my own Caterpillar Roll at home and got the idea from the menu which says:  Inside - teriyaki flavored shitake mushroom, yam, cucumber.  Outside - avocado, sesame, teriyaki sauce.

I also want to take this opportunity to introduce a different kind of rice for sushi rice.  In the past, I blogged about making sushi here and here.  I was using short grain brown rice and quinoa.  However, DH thinks that he still likes sushi better with white short grain sushi rice than brown short grain brown rice.   Since I am trying to avoid white short grain rice, I came up with the idea of using semi brown short grain rice.  The Japanese successfully created a healthier  semi brown short grain  rice called Haiga.   Haiga rice is neither white or brown, it is in between or so called semi brown.  The rice bran was meticulously removed and the nutritious rice germ was left intact. It is perfect for a healthy sushi rice.

Vegan Caterpillar Roll
Makes 2 large rolls

Printable Recipe


Teriyaki Sauce:
You can always purchase a store-bought teriyaki sauce.  Below is what I came up with.
1/3 cup Kombu dashi (recipe below) or vegetable broth
1/3 cup Japanese soy sauce
1 Tbsp. Dark Mushroom Soy Sauce
1/3 cup Aji Mirin or other kind of mirin
2 Tbsp Agave Nectar
1 tsp. Toasted Sesame Oil
2 tsp.  Cornstarch

Direction: 
  1. Combine all the ingredients in a small pot.  Stir to combine thoroughly.
  2. Bring to a boil, turn down the heat to low and simmer for 6 minutes.
  3. The mixture will thicken slightly.  Let it cool.
Kombu Dashi:
You can always use vegetable broth.  However, I found that adding kombu and dried shitake mushrooms will add a lot of umami.

6-8 cups water
1 large piece of kombu
8-10 dried shitake mushroom
Direction:
  1. Combine all ingredients in a medium pot.
  2. Bring to a boil, turn heat to low, let it simmer for 30 minutes.
  3. Take out kombu and shitake mushrooms  (remove the stems and use the mushrooms for other cooking such as this roll).

Haiga Sushi Rice:
1 1/4 cups Haiga Rice
1 1/2  water
3-4 Tbsp. Organic Seasoned Rice Vinegar
1 Tbsp. Aji Mirin or other kind of mirin
3/4 Tbsp. Agave Nectar
1/2 tsp. salt

Direction:
  1. Rinse haiga rice, drain.  Combine rice and water in a medium sauce pan and let it soak for 30 minutes.
  2. Cover tightly and bring to a boil, then reduce the heat to low and simmer for about 30-40 minutes until water is absorbed.  Remove from heat.  Note: you can also cook this rice in a rice cooker with 'semibrown' setting.
  3. Dump the rice into a wide shallow bowl. Combine rice vinegar, mirin, agave nectar, and salt in a small bowl.  With a wide spatula or a rice paddle, slice into rice at a 45 degrees angle while pouring the rice vinegar mixture.  Continue to combine and slice rice clumps until all the rice vinegar mixture is combined with the rice.  
  4. Use a magazine or a paper fan, fan the rice to cool while stirring for about 5-8 minutes.  This method will combine the flavor and give the sushi rice a nice gloss.
  5. Cover with a damp kitchen towel while preparing other ingredients.
Caterpillar roll ingredients: Avocado, cooked shitake mushrooms, teriyaki sauce, cucumber, yam

Ingredients (Caterpillar Roll):
1 large ripe Avocado
4-6 cooked shitake mushrooms, sliced
1/2 cucumber, sliced lengthwise
1/2 yam (Jewel or Garnett yam)
Haiga sushi rice, recipe above
2 -3 Toasted nori for sushi
Toasted sesame seeds
Teriyaki sauce
Sriracha hot sauce
Direction:
  1. Steam yam in a food steamer for 20 minutes. Check for firmness while steaming as each yam is  different in sizes.  Don't let it be too mushy.  It needs to be cooked but still firm.  Let it cool, peel, and slice lengthwise similar to the cucumbers.
  2. Add 1-2 Tbsp. teriyaki sauce to sliced mushrooms.  Set it aside.
  3. Cut the avocado in half, remove the pit, peel and slice the avocado horizontally as pictured below. I learned from this youtube video on how to arrange the avocado on top of the roll.

Rolling the Caterpillar:
I use a bamboo sushi rolling mat that I bought from a Japanese market.  I covered it in a plastic bag so the rice won't stick to it.  I will explain the process below.  However, you can watch this youtube video showing the process of rolling a caterpillar sushi.  It is actually quite fun making this roll.

Put sushi rice with wet hand on bamboo sushi mat.  Spread and pat it down.


Add nori on top and arrange the filling (yam, cucumber, teriyaki flavored shitake mushrooms) on the bottom half.
Roll with the bamboo mat tightly until a firm roll is achieved (see youtube for a demo).
Add avocado slices in the same direction and rolled into the rice roll.
Sprinkle with sesame seeds and cut in pieces with a sharp clean damp knife.
Arrange on a plate and drizzle with teriyaki and sriracha hot sauce.
Sliced caterpillar roll on its side.
If it seems that it is hard to make this dish, it is actually not if you use short cuts by buying a store-bought teriyaki sauce and avoiding to make the kombu dashi. This dish is quite easy to make once you got the hang of rolling sushi and it is quite delicious and filling.

Tuesday, October 18, 2011

5-Colors Bowl and Vegan Furikake


This bowl is inspired by my recent trip to Portland, OR.  I was brought to Cafe Yum by my friends Yongkie and Pokie.   The bowl that I ate at Cafe Yum, Jazzy bowl, was good but I thought the sauce was kind of too rich.   Then, Yongkie offered to make similar bowl at his home and he made Miso Ginger sauce instead of the rich sauce at Cafe Yum.  I like the bowl he served me.  The sauce was lighter and sweeter than what I had in Cafe Yum.  He served brown rice topped with black beans, chopped tomatoes, black olives, avocado, onion, and cilantro. It was yummy! Of course, later on I visited Native Bowl and ate more bowls of goodness (Couch Bowl and Mississippi Bowl).   I love 'the bowl' concept and was first introduced to it by visiting Native Foods where I tried Soul Bowl, Gandhi Bowl, Hollywood Bowl, etc.

The concept of a bowl is to have some kind of grain, protein, vegetables, seeds/nuts, other savory toppings, and sauce in one bowl.  The grain can be brown rice, quinoa, bulghur, millets, coucous, or any other grain.  The protein can be tofu, tempeh, all kind of beans,  and seitan.  You can use your imagination what kind of vegetables to put in your bowl, there are plenty.  The vegetables can be raw, steamed or roasted.   Any kind of roasted or raw seed /nuts can be added into the bowl.   Now, the secret is in the SAUCE!


5-Colors ingredients.
 I came up with this 5-colors bowl because I think that when we eat, we start with our eyes.  If the food is colorful, it is appetizing.  This bowl is colorful, fresh, and healthy.  The 5 colors are yellow, red, green, black, and brown.   I also think that this is an Asian Fusion dish which means that there are some Asian elements in it such as Adzuki beans, Sticky brown rice, Miso ginger sauce and Furikake.  Asian dish usually doesn't incorporate avocado, chopped tomatoes, and black olives such as a Mexican dish.  I can say that this is Japanese Mexican dish? Below is my own Miso Ginger Sauce recipe to go with the colorful bowl.

Miso Ginger Sauce

2 tsp. canola oil
1Tbsp.  fresh grated ginger
1/4 water
1/4 rice vinegar
1/4 white miso
      Note:  I use South River Organic Chickpea Miso
2 Tbsp. Hon Mirin
1 Tbsp. Agave Nectar
1 tsp. sesame oil
Optional: to thicken the sauce mix 2 tsp Mochiko Sweet Rice Flour with 1 tbsp water, add the to sauce, simmer for 1 minute.

  1. Heat oil in a small sauce pan, then, add the fresh grated ginger.  Saute for a few minutes until fragant.
  2. Add water, rice vinegar, and white miso.  Using a whisk, mix it together until miso is breaking down and sauce is simmering.  Simmer for 2 minutes.  If a thicker sauce is preferred, you can add the rice flour and water mixture to thicken it.
  3. Take it off heat, add mirin, agave nectar, and sesame oil.  Note: Since my miso is not smooth, I use a hand blender (stick blender) to mix the sauce together into a smooth light brown sauce.  Some miso is already smooth and this step is not necessary.
5-Colors Bowl (makes 4 bowls)

3-4 cups steamed brown rice ( I use My Perfect Brown Rice for this recipe)
2 cups steamed Butternut Squash (cubed)
           Note:  I bought cubed and peeled butternut squash from Trader Joe's as a shortcut. 
1 can 15 oz. cooked Adzuki Beans
1 cup chopped fresh tomatoes
1 avocado, peeled, sliced/chopped, about 1 cup
   Note:  I happen to buy an organic Reed Avocado (pictured above)
1 small 8 oz.  sliced black olives
3 green onions/scallions, chopped
Miso Ginger Sauce (recipe above)
Vegan Furikake (recipe below), optional 
   Note: if you don't like seaweed, you can add toasted sesame seeds only, brown or black.

    Drizzle the Miso Ginger Sauce on top of rice.
  1. Scoop about 1 cup of steamed rice onto a bowl and drizzle with Miso Ginger sauce.
  2. Add 1/4 cup cubed steamed butternut squash, adzuki beans, chopped tomatoes, sliced/chopped avocado, and sliced black olives.
  3. Drizzle with more sauce.
  4. Top with chopped scallions and vegan furikake(optional).
  5. 5-Colors Bowl with Miso Ginger Sauce, all mixed together.


This bowl has all kind of flavors: sweet, tangy, hearty, fresh, and salty.  The furikake adds 'seafoody' flavor to it, too.

Furikake  (Japanese rice seasonings) usually contains shaved bonito (fish flakes) if you buy it commercially at a Japanese market.  It also may contain MSG (monosodium glutamate).  I make it myself at home to avoid these ingredients.  If you like seaweed and sushi, usually, you'll like furikake.  Below is my vegan furikake recipe:

Vegan Furikake
1 tsp. sugar
1/2 Tbsp. Vegetarian Seasoning (Mushroom Seasoning, pictured below)
 Note: Mushroom seasoning can be bought at Asian markets.  Nowadays,  it is hard to find one that has no MSG in it.  I particularly like this brand which contains no MSG, not too salty,  and also vegan.  If you cannot find mushroom seasoning, you can use nutritional yeast or your favorite dry vegan broth powder.

2 Tbsp.  Toasted Sesame Seeds (or more if you like)
3-4  large Toasted Seaweed (seaweed sheet for making sushi) or Seasoned Seaweed Lavers (Korean seaweed snacks, cut into large pieces
Salt to taste
Note: Some mushroom seasoning or broth powder has a lot of salt.  You may want to taste first before adding salt.

  1. Combine sugar, veg. broth powder, sesame seeds, seaweed pieces in a DRY food processor.
  2. Pulse or run food processor until seaweed is broken into tiny pieces.  The mixture should be dry(pictured below).  Store in a dry and tight container such as a glass jar, a tight tupperware, or a dry spice jar for an easy sprinkle.

I often have a snack of seaweed laver, topped with steamed brown rice,  steamed veggie (in this case it was some butternut squash) and sprinkled with my vegan furikake.  Roll it up like a sushi!


Thursday, August 14, 2008

How to Make Vegan Fish or Mock Fish - Vegan Unagi Donburi

If you've ever been to Chinese Buddhist vegetarian restaurants and ordered dishes with 'fish' in it, you probably thought about how the mock fish was made. Below is a recipe that reveals the secret of Chinese Buddhist vegetarian fish. They use fresh or frozen yuba (which you may found it in the frozen or refridgerated sections of an Asian market) that is chopped into small flakes and then seasoned and wrapped in a nori sheet (sometimes a yuba sheet is added on the outside of the nori for a crispy skin). Then, it is steamed, cooled, and sliced into a fillet. Most Chinese Buddhist restaurants deep fry the yuba and nori wrapped 'fish' and then top it with flavored constarch thickened sauce.


Fresh or frozen yuba pockets (pictured) are hard to find in certain parts of this country (or your country). I found it in a nearby Asian market. But it is easier to find dry yuba sheets or sticks in Asian markets near you, probably? You'll have to do a few extra steps with yuba sticks because it is harder to soften them.


2 lbs fresh or thawed yuba pockets OR 2 pkgs dried yuba (6 oz. dried each) - see how to prepare below3 tsp sugar
6 tsp vegetarian bouillon mix powder
Note: I used Harvest 2000 Vegetarian Bouillon Mix chicken flavor or Bill's Best Chiknish1/2 tsp salt (use 1 tsp if using chiknish since it is not salty)
1-2 tsp kelp granules or more, depending on how 'seafoody' you want it to be
6 Tbsp cornstarch
1 1/2 Tbsp sesame oil
4-6 nori sheets

Glue mixture:
2 Tbsp Cornstarch mixed with 2 Tbsp water


Preparing with dry yuba sheets or sticks:Soak dry yuba in a lot of warm water in 2 large bowl. Make sure the water covers the yuba. Let it sit over night or at least 6 hours.
If they are not soft enough, boil a large amount of water in a large pot, simmer soaked yuba about 5 - 8 minutes. The idea is to make the yuba soft. After soaking, a few sections of the yuba are still hard. Simmering them for a few minutes will help.

Let them cool and then squeeze the water out as much as you can, then proceed to the next step below.


Preparing 'fish' mixture (with fresh or dryyuba):
Chop the yuba with a knife or put the yuba (soaked yuba) in a food processor and process about 5 seconds only. Do not process too long. The idea is to chop them to small flakes.
Squeeze the water out of the yuba (especially if using dried yuba sticks). You may use a piece of cloth or drain the yuba in a colander and squeeze the water out using your hands. Transfer the yuba to a large bowl and add the rest of the ingredients, excepts the nori and glue. Mix really well.

'Fish Fillet' :
Layer a piece of nori on a cutting board. Brush lightly with the cornstarch and water mixture (glue mixture). Scoop about 1 1/2 cup of the 'fish' mixture on the bottom half of the nori sheet. Press it down with your fingers or a spoon. You need to press and squeeze the filling tightly so it won't fall apart after it is steamed and cooked. I found out that if you wet your hands, the mixture will less likely to stick on your fingers or you can use a saran wrap.

Then, fold the other half of the nori over and make sure there is a 1/2 inch overlap to cover the fish (see picture). Seal the fish using cornstarch and water mixture that is spread over the 1/2 inch overlap and press and squeeze the 'fish' mixture tight together as much as you can. Repeat with the rest of the mixture for each nori sheet.
Steaming 'Fish Fillet' :
To prevent sticking to your steamer, put a few of cabbage leaves or lettuce leaves on your steamer, arrange fillet on top of the leaves (see picture). I have used Chinese bamboo steamers without leaves and it works nicely (didn't stick). Steam for 20 minutes. Let the fillet throughly cool before transferring it out of the steamer. Put them in the refridgerator to cool off some more for a few hours before cooking it. They freeze well.

Cooking Tips:
It is best to use the 'fish' for cooking after it is refridgerated for a few hours or frozen and then thawed.

JAPANESE VEGAN UNAGI DONBURI ('Eel' On Rice Bowl, pictured above)
Donburi

Also, featured in Dimensión Vegana in Spanish Language with Video.

I used to order Unagi Donburi when I visited Japanese restaurants before I became a vegetarian. I sometimes missed the 'sea' flavor of Unagi. I was able to re-create this dish after I discovered how to make my own vegan fish. It is best to eat this dish accompanied by vegetable miso soup and vegan kimchi. Since the unagi sauce is so sweet, the saltiness of the miso soup balance it out. I also serve it with hot Genmai Cha (Japanese green tea with roasted brown rice). I am now back to eating Japanese food again.

1 recipe 'fish fillet' above
Note: For Unagi, I added 1/4 cup of reconstituted chopped wakame seaweed when making the 'fish fillet'. This will add more 'sea' flavor to the fillets. This is optional, of course.
vegetable oil
2 Tbsp. Toasted Sesame seeds
Dash of roasted sesame oil

4 cups steamed Japanese rice (short grain rice, white or brown)

Sauce:
1/3 cup Japanese soy sauce
1/3 cup Mirin (Sweet Style Japanese Mirin)
1/3 cup vegetarian Kombu Dashi or vegetable broth
2-3 Tbsp sugar, depending how sweet you like it or use agave syrup


Prepare the sauce:
Put the sauce ingredients together in a small pan. Simmer until the sugar is dissolved, about 5 minutes. Set it aside. I only use a small amount of sauce for each fillet. It is a matter of preference. Some people likes lots of sauce on their donburi. If you do, you can double the recipe.
Preparing the unagi:Heat a non-stick frying pan, then add 1/2 to 1 tsp vegetable oil. Pan fry 'fish fillet' in batches,2 fillets each time. Make sure both sides are crispy. Turn down the heat to low, pour 1/3 of sauce over fillets. Let the sauce cover the fillet and immediately take it off the heat. You don't want the sauce to crystalized in the pan. The longer you cook the sauce in the pan the thicker it will be. Repeat for the rest of the fillets.

Divide rice into 4 or 6 bowls. Transfer and divide the fillets and sauce on top of the rice. Sprinkle with dash of roasted sesame oil and toasted sesame seeds on top.

Yield: 4-6 servings

Sunday, August 20, 2006

Sushi Party: Vegan Temaki and Inari Sushi


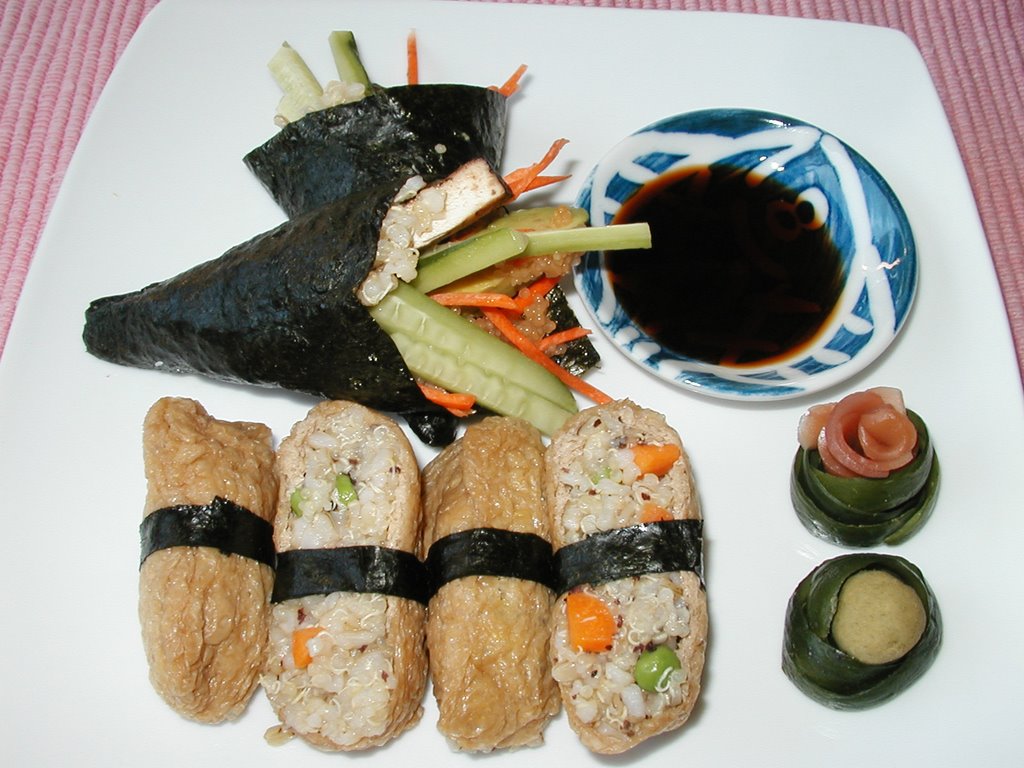
More sushi? That's right, I am sushi crazy at this moment. This time I made 2 different ones: Inari and Temaki sushi. Inari sushi is made of seasoned aburage or tofu pouches (the brown pockets) filled with sushi rice. The Temaki Sushi (the cone shape one) is a hand-rolled sushi which is great for a sushi party. I'll tell you why later! Both kinds were filled with brown rice and quinoa mixture from my previous post: Vegan Quinoa and Brown Rice Sushi and Cavi-Art.

It is easy to order Inari sushi in any Japanese sushi bar or restaurant. Most of the time, the chef can prepare you some. It is considered vegetarian by them but I know that usually fish broth is used to cook and season the tofu pouches. It is only a miniscule amount but it is not pure vegetarian. You have to ask! The Japanese market also sells the seasoned tofu pouches (ready made for Inari). But again, guess what is used to season them? Yes, bonito flakes or broth! So, please read the ingredients if you are concerned of buying a pure vegetarian product. I seasoned my own aburage (recipe below). Un-seasoned aburage or tofu pouches can be bought in any Japanese or Asian market. It turns out that I need to buy frozen ones since the refrigerated ones may have been on the shelves too long. They can become moldy as I found out. Yuck! The Korean market near me sells it in frozen section.


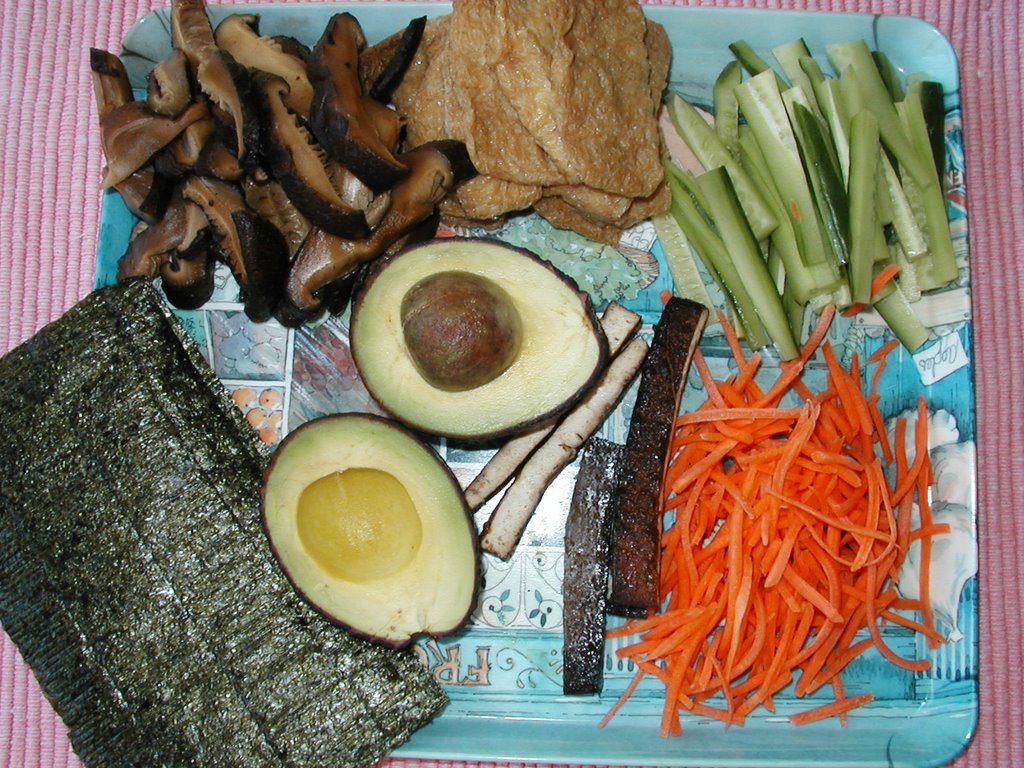
The Temaki sushi or hand-rolled sushi is great for a sushi party. This kind of sushi is only good to eat when it is freshly made (unlike the ones rolled in a bamboo mat). If Temaki sits for a while, the nori becomes tough and chewey. Therefore, instead of rolling them ahead for your guests, put your guests to work! The ones who don't want to do it can enjoy your pre-made Inari and bamboo rolled sushi pieces you prepare ahead. But most of the time, everyone wants to participate. You can pile all the fillings on a tray (as pictured below), prepare a bowl of sushi rice, and put them in the middle of the table. Each guest should be supplied with a damp hand towel to wipe their sticky hands from rolling and a small bowl of water to glue the nori together. Then, the host or hostess (ME!) can demonstrate how it is rolled and how to make the cone shape with the sushi rice and the filling in the middle.

Anyone can be taught to roll a Temaki; after all, I was able to teach DH (dearest husband) who doesn't cook but likes to eat. He did pretty well, too! It is fun if you are with good company who likes sushi and enjoys something different. It should be a fun thing to do for a small group gathering where you want to have some conversation to catch up with old or new friends.

The Temaki filling from the top left, clockwise, are: seasoned shiitake mushrooms (recipe below), seasoned aburage (recipe below), sliced Japanese cucumbers, shredded carrots, seasoned and smoked baked tofu (recipe below), organic avocado, and nori sheets (cut in half).

Below are small recipes to prepare for Temaki and Inari sushi:

Printable Recipe

Seasoned Shiitake Mushrooms
6 dried or fresh shiitake mushrooms
1/2 cup mushroom soaking water or vegetarian broth or kombu dashi
1 tablespoon organic sugar
1 1/2 tablespoon soy sauce or tamari
2 tablespoon aji-mirin

If using dried mushrooms, cover mushrooms in warm water until softened for 20-30 minutes. Discard stems from mushrooms and sliced them thin (1/4 inch thick). Place the rest of ingredients in a sauce pan, bring it to a boil, then, simmer mushrooms in this mixture for 10 minutes. Remove and let cool.

Seasoned Aburage (tofu pouches)
8 pieces thin deep-fried tofu pouches/aburage (store bought! don't try making it yourself)
1 cup mushroom soaking water or vegetarian broth or kombu dashi
2 tablespoons organic sugar
2 teaspoons mirin
2 tablespoons soy sauce or tamari

Boil about 3 or 4 cups of water. Remove from heat after boiling. Put thin tofu pouches in hot boiling water to remove the excess oil. Soak and dip for 2 minutes. Drain the pouches in a colander. Squeeze the water out after they are cool a bit.
In a saucepan, combine the rest of the ingredients and let it boil, stir to dissolve the sugar. Reduce the heat and simmer the tofu pouches in this mixture for about 10 minutes. Turn off heat and let it cool. Let the pouches soak in this mixture until ready to use. Squeeze the broth mixture out and cut each pouch lengthwise to make two open pockets. Seasoned aburage is ready to be used in Inari sushi.

Inari Sushi
1/2 recipe of brown rice and quinoa sushi filling (recipe in previous post)
1/4 cup chopped carrots
1/4 cup frozen green peas
16 pieces of seasoned aburage pockets (from above)
1 teaspoon dulse flakes, optional

Blanch carrots and green peas in boiling water for 2 minutes, drain, rinse with cold water to retain the color, and let them cool. Mix carrots and green peas with the sushi filling. Add dulse flakes, if desired, and mix well. Fill the aburage pockets with 2 to 3 tablespoons of sushi rice.

Smoked Baked Tofu
1 to 1 1/2 lb. extra-firm tofu
3/4 to 1 cup water
1/4 cup dark Superior brand mushroom soy sauce
Note: regular soy sauce will do but this dark mushroom soy sauce is my preference. It makes the baked tofu dark chocolate brown but the inside is light cream color. Pretty and delicious!
2 tablespoon maple syrup or organic molasses
1 teaspoon hickory liquid smoke

Slice tofu about 1/3-inch thick lengthwise. Mix the rest of the ingredients in a plastic container with tight lid in which you can soak all of the tofu slices in this marinade sauce. Marinate the tofu slices for 24 hours in refrigerator. Bake drained marinated tofu slices on an oiled cookie sheets for 10- 12 minutes in 400 F oven. Flip and bake the other side about another 10-12 minutes. Let them cool before use.

As you can see, it is not that hard to prepare. Now, if you want to learn how to roll a Temaki sushi, please let me know and I'll invite you to our sushi party. We can have conversations while rolling so we'll know each other better and become lifelong friends!

Monday, August 07, 2006

Vegan Quinoa and Brown Rice Sushi and Cavi-Art


As you can tell, I am still in Japanese cuisine mood! I made vegan quinoa and brown rice sushi this time. I have been making sushi since the days before I became a vegetarian (10 years ago) . After becoming a vegetarian, veggie sushi was one of the first dish I tried to make. However, last week, it was the first time I used quinoa and brown rice mixture (following WW Core) in sushi. The result was amazing!

The idea came from a recipe of a Sushi Salad (Bara-Sushi) with Quinoa and Brown Rice from Bryanna's newsletter. I was thinking that I can roll this mixture and make rolled sushi. I added some vegan 'fish eggs' in the sushi. Yes, there is such a thing! I can't believe it myself when I first heard about it from a friend that I had to order some. They are basically fake caviar made of sea vegetables. Check this out: Cavi-Art . It was invented by a mistake according to the story. BTW, only the Black and Yellow lumpfish are vegan. I used the yellow lumpfish in the rolled sushi and the black ones on top. Professional chefs use this fake caviar in their dishes, vegetarian or not. Probably, it is due the high price of real caviar.

The pale green glob is wasabi. I used natural wasabi powder I bought from health food market. Most wasabi out there contains green food coloring. The natural wasabi is pale but there is no additives in it. The Japanese market sells wasabi in a paste form in a tube like toothpaste too but I prefer the powder form without food coloring.

The pinkish rose is Japanese pickled ginger that I bought from an Asian market. The idea of making a rose out of pickled ginger came from my favorite sushi cookbook: Vegetarian Sushi by Brigid Treloar. This cookbook contains artful designs of vegetarian sushi and garnishes with lots of picture. I just love it! The recipes are mostly vegan except some that use omelet. What helped me the most was the technique to make sushi rice (brown or white). The rice has to be hot while the seasonings (rice vinegar, sugar, mirin, and salt) are poured into it. Then, you have to fold the rice with over and under motions while your other hand (or your loved one's hand) is fanning the rice with a fan. I usually use my left hand to fan and my right hand to stir and fold. It is quite a challenging! Just like when you try to draw a cirlce with the right hand and a square with the left hand at the same time. After a while, the sushi rice becomes cool, shiny and sticky. The technique really works!

Vegan Quinoa and Brown Rice Sushi
Makes 32 sushi pieces
Printable Recipe

Sushi Rice:

2/3 cup short-grain brown rice cooked in 1 1/4 water
1/2 cup quinoa cooked in 1 cup water
3 - 4 Tbsp. Organic Seasoned Rice Vinegar
1 Tbsp. Aji-Mirin (or other kind of mirin)
3/4 Tbsp. vegan sugar
1/2 tsp salt

Filling:

Shredded carots from 1 carrot
Thinly sliced peeled and seeded cucumber from 1 cucumber
Sliced avocado from 1 avocado
Yellow lumpfish and
Black lumpfish Cavi-Art


4 Nori sheets
a small bowl of water to wet your finger
Natural Wasabi Powder
Soy sauce

Preparation:
  1. Mix natural wasabi powder ( 1:1 ratio) with water to create a thick paste. Let it sit for at least 10 minutes (if you use it right away after mixing, it could be bitter).
  2. Cook brown rice for 45 minutes. 30 minutes after the brown rice has been cooked, cook Quinoa in simmering water for 15 minutes, remove it from heat and then let it sit for 10 minutes. This way the brown rice and quinoa will be ready almost at the same time.
  3. Combine brown rice and quinoa in a shallow glass bowl. Add all the seasonings for sushi rice (rice vinegar, mirin, salt, and sugar) and fold the quinoa and brown rice with over and under motions with a rice paddle while fanning the rice at the same time to cool it off. After about 5 minutes, the mixture should be cooler, shiny, and sticky. Taste the rice. Add more rice vinegar or salt if necessary.
  4. Use a sushi bamboo mat layered with a piece of saran wrap on top it, place the nori sheet on top of it (shiny side down).
  5. Divide quinoa and brown rice mixture into 4 equal parts. Layer 1 part of rice on the lower half of the nori and pat it down with your hand (using saran wrap helps for the rice mixture not to stick onto your hand). Cover only about 1/2 of the nori (lower half) with rice mixture.
  6. Pile filling lengthwise on the middle of the rice mixture.
  7. Lift the bamboo mat and fold all together to form a log on the lower half where the rice mixture covered the nori. Squeeze tight the bamboo mat evenly. Wet your finger with water and dab about 1 inch of the edge of the nori on the upper half.
  8. Release the bamboo mat and plastic wrap from the sushi log. Roll the sushi log to the upper half of the nori. Use the bamboo mat if necessary to tighten the roll. The upper half of the nori should stick to the log.
  9. With a sharp knife, cut the log into half. Then cut each half equally into 4 pieces.
  10. Repeat for the previous step to make 3 more rolls.
  11. Serve with wasabi, soy sauce, and pickled ginger.
I even taught my co-worker to make this during lunch time at work. My co-worker bought frozen already cooked brown rice from Trader Joe's and I cooked the quinoa at home. Then, we reheated both grains in a microwave. By golly, it worked! I really like the shortcut to buy the frozen brown rice from Trader Joe's! She thought that the fanning of the rice mixture was so much fun. She also said that someone really needs to show her how to do the technique because she would not able to follow just from a recipe. That made me thinking that I can start a cooking class and quit my job (just kidding).

Wednesday, August 02, 2006

Vegan Teriyaki 'Steak', is it possible?


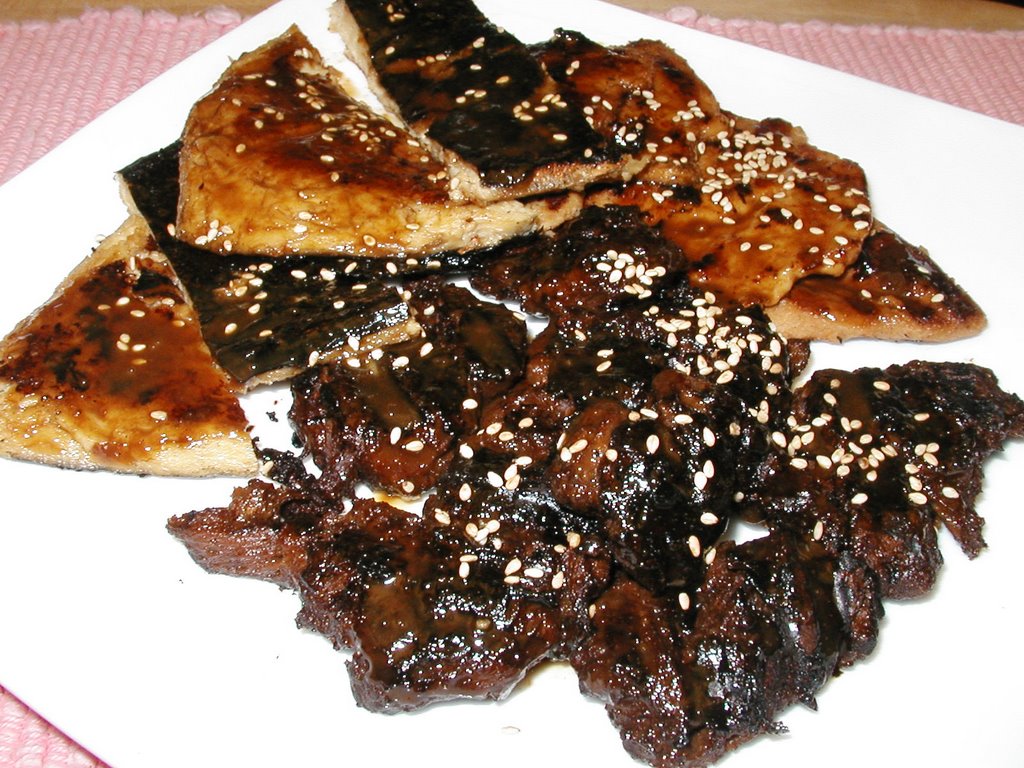
Yes, it is possible if you know Bryanna. I am her no.1 fan and a long time vegan feaster who follow her creations in her newsletters. Her recent newsletter features 'vegan steak'. So here it is, my use of her 'steak', and of course, I have to make it Asian style. Above in the picture are teriyaki 'steak' (DH called it Japanese Kobe Teriyaki Steak), teriyaki 'pork cutlet' (Bryanna's recipe too), and teriyaki 'eel' (using store bought vegan fish). These were marinated in my own wasabi teriyaki sauce and bbqued in my Cuisinart panini bbq grill/griddle. When I was eating meat, I love teriyaki anything and since I became a vegetarian I realized that I missed the flavor and texture of bbqed teriyaki instead of the meat and the blood in it. Bryanna's creation of faux steak has satisfied that cravings in me.

I know some vegetarians(non-vegetarians) are disgusted with faux meat or mock meat but I am with Bryanna in this. We are having fun creating faux meat or fish that it has becoming a culinary art. It adds more variety to the dishes that we create eventhough we already have a lot of ways we can do with vegetables, fruits, grains, and legumes. We play with wheat gluten flour, soy flour, tofu, and yuba to create mock meat and fish. Bryanna is definitely the 'Queen of Faux Meat'. She can create seitans that the results were almost too real. I learned so much from her (even flew hundreds miles to attend her cooking vacation in 2004) in making faux meat that I bought 25 lbs. vital wheat gluten flour and have been making so many different kind of seitan since.

I can't post the 'steak' recipe since it is reserved for vegan feasters only (who subscribes to the newsletter). I am posting my wasabi teriyaki sauce recipe which I created after I bought SoyVay Wasabiyaki sauce. Soy Vay has delicious sauces but this time I made my own to save money and honestly I can't stand the challenge of not recreating it at home. Here is the recipe:


Wasabi Teriyaki Marinade/sauce
Printable Recipe

2 cloves garlic, minced
1/2 cup chopped onions
1 tbsp toasted sesame oil
1/2 cup tamari or soy sauce
1/2 cup Aji-mirin or Japanese cooking wine
1 cup water mixed with 4 tsp cornstarch
1/2 cup organic apple juice
2 tbsp organic molasses or other sweetener
4-5 tsps wasabi powder
1 tbsp brown sugar

Heat 1 tbsp sesame oil on a skillet on a medium high heat. Add minced garlic and chopped onions. Saute for several minutes until onions are soft.
Add soy sauce, mirin, apple juice, molasses, and brown sugar. Let it come to a boil.
Add water and cornstarch mixture. Let it come to a boil again.
Add wasabi powder and turn off heat.
Transfer to a blender. With the top off or the middle part of the blender off (this is to prevent accident in blending hot mixture) and use a kitchen towel to cover the top and hold it with your hand, blend the teriyaki mixture for several minutes until smooth (carefully, start from the lowest setting of your blender and go the the puree setting).
Let the sauce cool before storing it in a bottle or jar. Keep in refridgerator for months.

Servings: 16
Yield: 3 cups

Nutrition FactsNutrition (per serving): 31.9 calories; 24% calories from fat; 0.9g total fat; 0.0mg cholesterol; 2.1mg sodium; 63.4mg potassium; 4.9g carbohydrates; 0.1g fiber; 3.3g sugar; 4.8g net carbs; 0.1g protein; 0.7 points.

We ate the teriyaki with pan fried cabbage, carrots, broccoli, and a bowl of steamed brown rice. I am going back to eating and cooking Japanese again. Japanese cuisine is the one cuisine I missed the most in terms of eating out (in my area, there is no Japanese vegetarian restaurant that I know of or any Japanese restaurant who serves vegetarian food).